
Artboard Studio Workspace - Templates
Artboard Studio is a browser-based online graphic design software for creating product mockups and more. It's in beta now and I'm lucky to be one of the beta testers. Let's take a tour of Artboard Studio.
After you sign in to your account, you will be directed to the Your Projects page (see screenshot). You will see two options. You can view the Walk-through Video or create a new project. On the left, you can upload an icon for your account. Below that is a simple menu for your projects, account settings, integrated plugins and tutorials/help.
At this time, the only integration is for your Figma, Facebook, Twitter, Mailchimp, Dropbox and Google Drive accounts (see screenshot). But they have plans to integrate with Sketch, Photoshop and Wordpress. I'm looking forward to the planned phone and desktop apps.
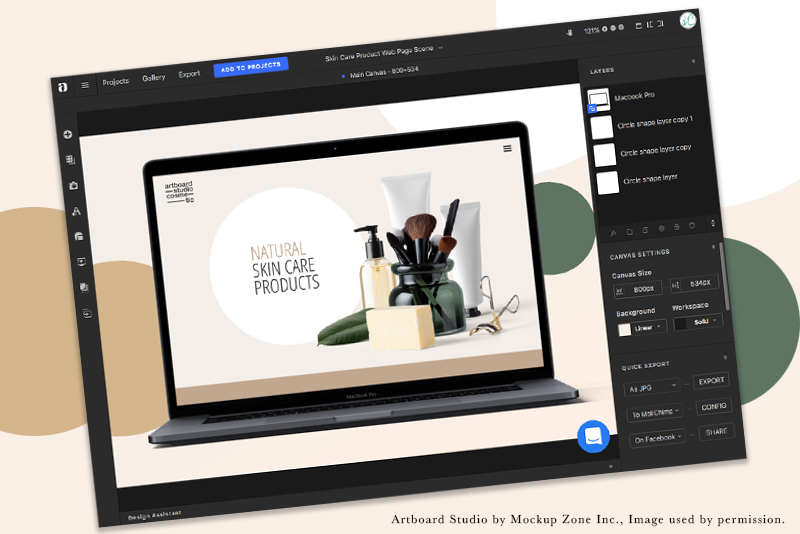
Clicking on the Create New Project button takes you to the gallery, where by default all the templates are listed (see screenshot). With the top menu, you can choose to just view top/front view templates or just perspective templates. The default size for the template is listed below each thumbnail. You can place your mouse over the thumbnail and click on the plus icon in the upper right corner of the thumbnail to see the larger view of the template in a pop up overlay. When you find a template that you like, just click on the thumbnail to begin customizing. For this tutorial, I chose the Skin Care Product Web Page Scene.
Before we select any objects on the canvas, let's discuss the Canvas Settings. In the Canvas Size menu (see screenshot), we can change the width, height, background color/gradient and workspace color. We also have a Quick Export menu. We can export our project as a jpg or png image. We can also send our project to MailChimp, Dropbox, Google Drive, Facebook, Twitter or Instagram.
As in Photoshop, each object is on a separate layer in the Layers panel. You can select an object in the scene and customize its properties. In the example, we have four layers but only one layer has a blue button on the lower left corner of the object thumbnail. This indicates that this object works much like a smart object in Photoshop and we can add our own screenshot or build a new webpage design on the screen.
When we select one of the circle layers, we can use the Object Settings menu (see screenshot), which includes the alignment, position, fill color, stroke color, border width, border dashed line, opacity, rotation, size and layer styles. Of course, the menu will change depending on which object you have selected in the Layers panel.
When working on the canvas, you can select an object on the canvas and drag it to a new position, rotate and scale the objects. When you right-click on the object on the canvas, you get a pop up menu with several options (see screenshot). Again, the menu will change depending on which object you have selected.
Continue
https://artboard.studio/
https://www.youtube.com/watch?v=aSCe5ZLR8rg
Artboard Studio screenshots used by permission of Mockup Zone Inc.
After you sign in to your account, you will be directed to the Your Projects page (see screenshot). You will see two options. You can view the Walk-through Video or create a new project. On the left, you can upload an icon for your account. Below that is a simple menu for your projects, account settings, integrated plugins and tutorials/help.
At this time, the only integration is for your Figma, Facebook, Twitter, Mailchimp, Dropbox and Google Drive accounts (see screenshot). But they have plans to integrate with Sketch, Photoshop and Wordpress. I'm looking forward to the planned phone and desktop apps.
Clicking on the Create New Project button takes you to the gallery, where by default all the templates are listed (see screenshot). With the top menu, you can choose to just view top/front view templates or just perspective templates. The default size for the template is listed below each thumbnail. You can place your mouse over the thumbnail and click on the plus icon in the upper right corner of the thumbnail to see the larger view of the template in a pop up overlay. When you find a template that you like, just click on the thumbnail to begin customizing. For this tutorial, I chose the Skin Care Product Web Page Scene.
Before we select any objects on the canvas, let's discuss the Canvas Settings. In the Canvas Size menu (see screenshot), we can change the width, height, background color/gradient and workspace color. We also have a Quick Export menu. We can export our project as a jpg or png image. We can also send our project to MailChimp, Dropbox, Google Drive, Facebook, Twitter or Instagram.
As in Photoshop, each object is on a separate layer in the Layers panel. You can select an object in the scene and customize its properties. In the example, we have four layers but only one layer has a blue button on the lower left corner of the object thumbnail. This indicates that this object works much like a smart object in Photoshop and we can add our own screenshot or build a new webpage design on the screen.
When we select one of the circle layers, we can use the Object Settings menu (see screenshot), which includes the alignment, position, fill color, stroke color, border width, border dashed line, opacity, rotation, size and layer styles. Of course, the menu will change depending on which object you have selected in the Layers panel.
When working on the canvas, you can select an object on the canvas and drag it to a new position, rotate and scale the objects. When you right-click on the object on the canvas, you get a pop up menu with several options (see screenshot). Again, the menu will change depending on which object you have selected.
Continue
https://artboard.studio/
https://www.youtube.com/watch?v=aSCe5ZLR8rg
Artboard Studio screenshots used by permission of Mockup Zone Inc.

Related Articles
Editor's Picks Articles
Top Ten Articles
Previous Features
Site Map
Content copyright © 2023 by Diane Cipollo. All rights reserved.
This content was written by Diane Cipollo. If you wish to use this content in any manner, you need written permission. Contact Diane Cipollo for details.


