Instagram Quote Template in Swift Publisher

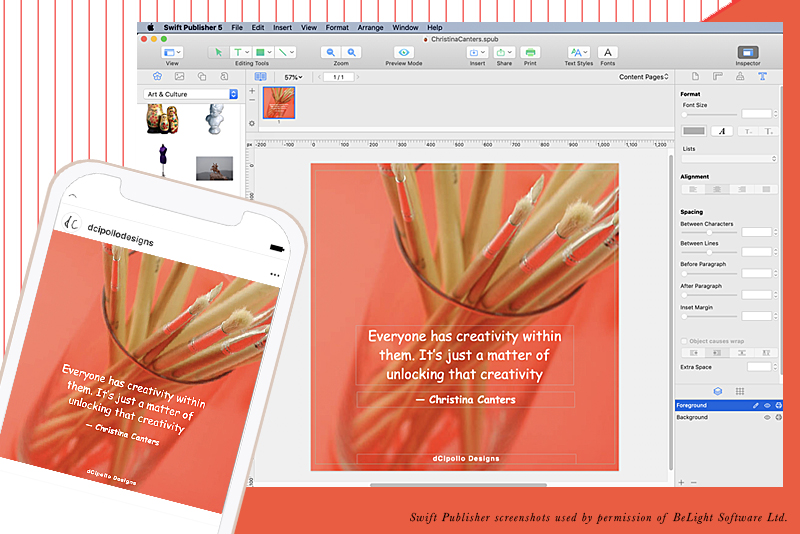
In this tutorial, we will design an Instagram quote template in Swift Publisher. Using a template can streamline your creation process, when creating social graphics. You will be able to customize the background and the text in the template for each new Instagram quote that you create with the template.
An Instagram post image dimensions are 1080 x 1080 pixels, so we will use these measurements for our template. This template will have two main design elements. The first is the background layer, which can be filled with a photo, illustration, pattern, gradient or solid color. For the template we will use a photo from the built-in clipart collection. Next, we have the Foreground layer for all the text. We will learn how to use the Text Box tool and Text panel.
Let's open Swift Publisher and get started. When you start the program, you will see the welcome screen (see screenshot), with a list of videos on the left. But let's watch those layer.
- Click the Close button at the bottom of the welcome screen. This will open the Template Gallery window.
- In the Desktop Publishing section of the Template Gallery window, choose the Blank Landscape template (see screenshot).
- Select the Document tab and you will see the Page Size and other information about our new page (see screenshot). Change the Measurement Units from Inches to Pixels. Next, change the Width and Height from 8.5 x 11 in to 1080 x 1080 pixels.
- With the Background layer active, select the Rectangle tool from the Editing tools section of the top Toolbar (see screenshot). Draw a rectangle over the entire design canvas.
- Click both buttons in the Center section (see screenshot). The left button will center align the rectangle shape horizontally and the right button will center vertically.
- Select the rectangle placeholder. In the Appearance panel, uncheck the Color Fill option (see screenshot). This will empty the rectangle placeholder.
- With the rectangle selected, drag your choice of photo from the Photo tab of the Source panel in to the rectangle placeholder (see screenshot). If the photo doesn't cover the entire rectangle, hold down the Shift key and resize the photo. Then return to the Appearance tab of the Inspector and set the Stretch drop-down menu to Fill (see screenshot).
- Select the Foreground layer in the Layers panel.
- From the top menu, select the Text Box tool (see screenshot). Click on the Canvas and drag to draw a text box. Click inside the text box and type or paste your quote text.
- Select the text and click the Text tab in the Inspector and click the A button to open the Fonts panel (see screenshot). Choose your font, style, color and size. In the Inspector, set the Alignment to Center.
- From the top menu, click File - Save as Template and name the template Instagram Quote Template.
- From the top menu, click File - Save and name your project.
- Next, click File - Export (see screenshot) and export your project again as a .jpg.
As you can see, there are many templates from which to choose. But we are designing our own template.
The template will open in to the workspace. The Inspector is at the right side of the workspace and contains most of the controls for designing our project. It has four tabs, which are the Document, Geometry, Appearance and Text tabs.
At the bottom of the Inspector, we have the Layers panel (see screenshot), with two default layers for Foreground and Background. We will add a rectangle to the Background layer that will act as a placeholder. For the template, we will add a photo in to the placeholder but we can change this to a color, gradient, photo or illustration as needed for each project.
At the top of the Geometry panel, you will see that our shape is the correct Size (1080 x 1080 px) and the X and Y positions are both zero.
This rectangle is now our background placeholder. For the template, we will add a photo.
Now we can add our text to the Foreground layer.
By default, the text is a small 9 pt. Let's change the font and enlarge the text using the Text panel in the Inspector.
Repeat these steps to add a smaller text box under the first box and add the person's name attributed to the quote.
Optional: If you wish to brand the quote graphic, add your company name or website url at the bottom edge of the graphic (see screenshot).
Now we can save this project as a custom template, so that we can use it again. Depending on the background and font we use each time, the Instagram graphic can look very different.
Next we will save the project in the Swift Publisher .spub format and then again in the .jpg format for the web.
Swift Publisher
Amadine
BeLight Software
Swift Publisher screenshots used by permission of BeLight Software Ltd.

Related Articles
Editor's Picks Articles
Top Ten Articles
Previous Features
Site Map
Content copyright © 2023 by Diane Cipollo. All rights reserved.
This content was written by Diane Cipollo. If you wish to use this content in any manner, you need written permission. Contact Diane Cipollo for details.


