
Artboard Studio Business Card Mockup
In this tutorial, we will create a business card mockup in Artboard Studio, using one of the predesigned templates. Starting from a template is the easiest way to create a mockup. All you need is your design that you will upload and place in to the mockup.
Even though we will be using a template, we can still customize the mockup for our needs. Remember that every design element, even the background, can be moved, resized, recolored and more.
https://www.youtube.com/watch?v=aSCe5ZLR8rg
Artboard Studio screenshots used by permission of Mockup Zone Inc.
Even though we will be using a template, we can still customize the mockup for our needs. Remember that every design element, even the background, can be moved, resized, recolored and more.
- When you login to your account, you will see the Create New Project button (see screenshot). Click this button to go to the list of templates.
- At the top right corner, click the icon to open the search bar and search for business card (see screenshot).
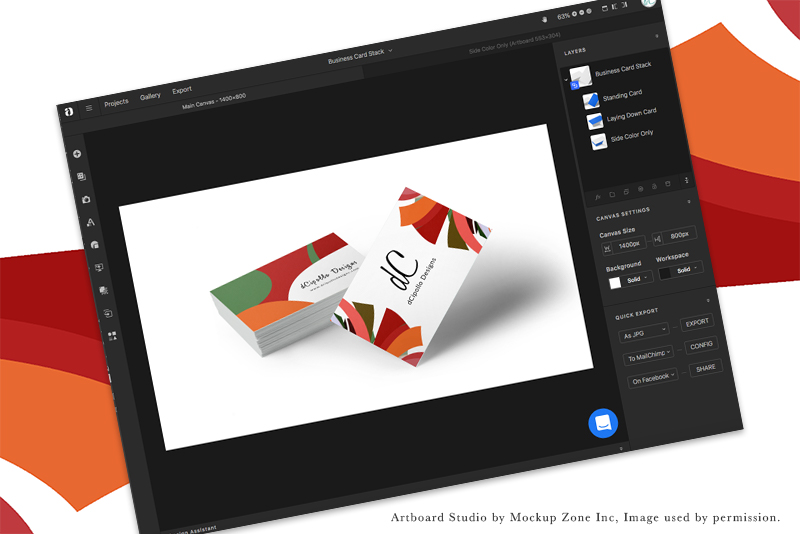
As my example business card has both a front and back design, I decided to use a mockup that displayed both sides of the card. At this time, we have a choice of two templates with that type of mockup, which are the Business Card Mockup and Business Card Stack. I chose the later (see screenshot). - Click on the template thumbnail to go to the Main Canvas.
As you can see in the Canvas Settings, we can change the Canvas Size and Background color/gradient. Let's keep the defaults for now. - Right-click on the business card on the canvas, to open the pop up menu (see screenshot).
As you can see, we have many options from Image Filters to Custom Shadow. Let's keep our first project simple and keep the defaults. We only need to upload and add our design in to the mockup. - Go to the Layers panel. We can add our design to the Standing Card layer, Laying Down Card layer and the Side Color Only layer.
- Click on the Standing Card layer to customize this object (see screenshot).
- In the left side menu, click the Your Uploads icon. Then click the Upload button to upload the card front and back designs (see screenshot).
- Click your design's thumbnail to add it to the canvas.
- At the top, click the Main Canvas tab to return.
- Click the Laying Down Card layer and add your card back design.
Now that we have our design in place, let's change the background color. I like to start by testing colors from the design. - In the Canvas Settings, click Background to open the Canvas Background color picker.
The default is a green to white gradient. Let's test some solid background colors. - Click the Solid button to switch from the default gradient (see screenshot).
- Select the Eyedropper tool to test a few colors from the design. In the example, I chose the dark red color.
The solid color is nice but a little dark. Let's test a gradient. - Click the Gradient button.
Notice the gradient bar under the button. Select each end circle and experiment with some gradients. When you find a gradient you like, click the X to close the panel.
In the example, I decided to use a solid white background. Finally, we need to change the color of the card sides. This is controlled by the Side Color Only layer.
14. Click on the Side Color Only layer.
As the default green background would cast a lighter green color on to the card sides, the default is a light green color. As our background is white, let's change this from light green to light gray (see screenshot).
That was an easy mockup! Artboard Studio automatically saves your work, so let's download our project as a .png.
14. In the Quick Export panel, set the export file type to PNG and click the Export button (see screenshot).
https://www.youtube.com/watch?v=aSCe5ZLR8rg
Artboard Studio screenshots used by permission of Mockup Zone Inc.

Related Articles
Editor's Picks Articles
Top Ten Articles
Previous Features
Site Map
Content copyright © 2023 by Diane Cipollo. All rights reserved.
This content was written by Diane Cipollo. If you wish to use this content in any manner, you need written permission. Contact Diane Cipollo for details.


